![]()
|
THE
CAT FOOD CAN ALCOHOL STOVE (A Lightweight
version of the Tuna Can Stove) The original tuna can stove hiked with me
along the Pacific Crest Trail last year (1999) for over 1500 miles, from Donner Pass near Lake Tahoe to This new, lightweight version of my stove was introduced at
ADZPCTKOP2, (i.e., the Second Annual Day Zero Pacific Crest Trail Kick Off
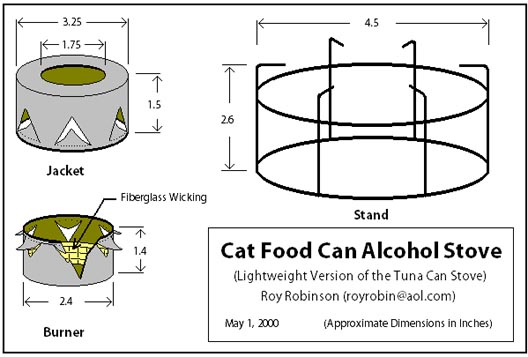
Party,) at MATERIALS: The drawing below shows the three parts of the stove. The
Burner is made from a 3 oz. cat food can and the Air Jacket is a 5.5 oz. cat
food can. 2 x 3 inch welded wire screen is
used to make the Stand. The aluminum foil windscreen is not shown in
the drawing. |
|
|
|
|
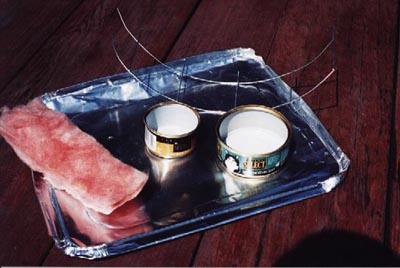
The raw materials needed to make the stove are shown in Photo No.
1. These are: § Two cat
food cans, one 3 oz. and one 5.5 oz. § Fiberglass
insulation. § 2 x 3
inch welded wire for stand. § Heavy
aluminum foil for windscreen. |
|
|
Photo 1.
Required Materials. |
|
|
|
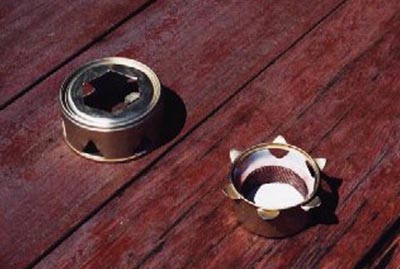
MAKING THE BURNER: Using a small church key-type can opener, cut six tabs from the
inside out around the sides of the smaller can. Cut some fiberglass
material and place it around the inside of the can, holding it in place
temporarily with a coil of metal window screen. The fiberglass should
come no higher than the bottom of the tab holes (about 1 inch above the
bottom of the can), and should be about 0.2 inch thick. See Photo No.
2. |
|
Photo 2. Air
Jacket (left) and Burner. |
|
The window screen can be removed after the stove has been used once
or twice. If you prefer, you can burn a couple tablespoons of fuel in
the burner now, and then remove the screen. |
|
|
|
|
|
|
|
|
|
MAKING THE AIR JACKET: Cut a 1.75 inch diameter hole in the bottom of the larger can and six
tabs from the outside in around the edge. I cut a hexagonal hole in my stoves
for no reason other than it's easy. You can see this in Photo No.
2. Use a large church key to cut the tabs if you have one. ASSEMBLING THE BURNER AND AIR JACKET: Straighten the tabs so they point directly toward the center of the
can and cut the sharp points off the tabs, no more than 1/16 inch. This will help the tabs hold the inner can in
place more firmly when they are assembled. Now, aligning the tabs on the two cans so they will miss each other,
push the burner into the air jacket. Adjust the tabs, if necessary, so
the burner is centered inside the jacket. The jacket should be pushed
down onto the burner until it and the burner are both resting on the work
surface. |
|
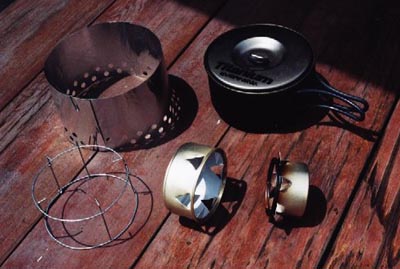
Photo 3.
Windscreen and Stand (left), with the Burner and Air Jacket in Position for
Assembly. |
|
|
|
|
|
|
|
|
|
|
|
|
|
|
|
|
|
|
MAKING THE STAND AND WIND SCREEN: The completed stand and windscreen are shown in Photo No. 3.
Approximate dimensions for the stand are given in the drawing on page
1. Bend the wire into a diameter that will fit inside your cook pot and
a height that will hold the pot about 1 inch above the burner/air
jacket. The windscreen is critical for proper operation of this or any
alcohol stove. Cut the windscreen out of heavy aluminum foil. An
oven liner or disposable baking pan is a good source of foil. Cut a
rectangle that is wide enough so the pot handle will just clear the
windscreen, and long enough so it will encircle the pot with about ¼ to ½
inch of clearance. Mine is 3.75 x 22 inches. The screen must come
up around the sides of the pot. If your pot handle won't allow that,
cut a notch out of the screen for the handle. Punch two rows of holes around the bottom edge of the
windscreen. A paper punch works well. I use a ¼ inch canvas
grommet punch. Bend the foil into a cylinder and hold the ends together
with paper clips. (Carry a couple extra paper clips. If you drop
one in camp, it's hard to find.) The windscreen can be rolled around your fuel bottle when not in
use. I keep the bottle and windscreen rolled inside my sleeping pad
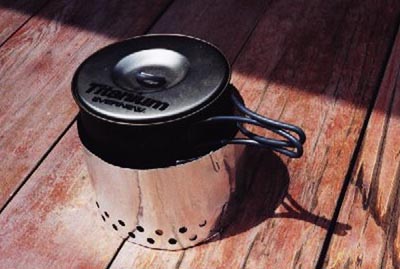
while on the trail. OPERATION: Using my 0.9 liter pot, the stove will bring one pint of cold water
to a boil in about five minutes. Use no more than 2 or 3 tablespoons of
alcohol, and plan to let it burn out. With the pot on the stove, there
will be no visible yellow in the flame. At night, you can see a nice
blue glow around the pot. |
|
|
Photo 4. The
Cat Stove in Operation. |
|
|
|
|
|
|
Caution:
In bright daylight, you may not be certain the stove is lit even when it's at
full heat. Be careful you don't find out the hard way by getting part
of yourself or any burnable material too close to the stove while it is
burning. |
|
|
FINALLY: This is an ALCOHOL stove. DON'T USE WHITE GAS, COLEMAN FUEL OR
ANY OTHER GASOLINE FUELS IN THIS STOVE! If you have questions or suggestions for improving the Cat Stove,
please send me a note at: royrobin@aol.com, or write to the address below.
Good luck to you on the trail! Roy L.
Robinson *
* *
*
*
*
* ADD A SIMMER RING TO YOUR CAT STOVE: << The trouble with these alcohol stoves is, they don't have a
simmer setting.... I can turn [my gas burner] down to simmer when I
want to, conserving fuel.... >> OK. You talk, we listen. My son Brian was over last night
to celebrate Fathers Day. We spent a good part of the evening playing
with the Cat Stove (new, lightweight version of the original tuna can stove.) Here are the results: Cut a 1 x 11 inch piece of the aluminum foil which you have already
used to build your windscreen, and wrap it around the air jacket of your Cat
Stove, covering the air intake holes. Tape the ends together so it
forms a simmer ring that will slide up and down over the air jacket to either
shut off or expose the air holes (or anything in between). I used metal
tape but a staple (punched from the inside, out, to avoid hangups)
will also do the job. You want to cut the simmer ring down to where it
will just cover the air holes. That way, it won't obstruct air flow
when you raise it to let the stove roar. Mine ended up at 7/8 inch in
width. With the air holes closed and 2 tablespoons of fuel, the stove kept a
pot of water simmering for 25 minutes (!) before burning out. It acted
like a Stearno can, burning the fuel very slowly
because it was starved for air. Next, we slid the simmer ring up so the
air holes were completely open. Again, 2 tbsp of fuel and a pint of
cold tap water in the pot. Light it off, and the water comes to a full,
rolling boil in under four minutes. (Ideal conditions, 70 degree
evening, no wind.) I then took the pot off, slid the simmer ring down
to cover the air holes and returned the pot to the heat. It simmered
for another full six minutes (10 minutes, total) on the original 2 tbsp of
fuel! BTW, is anyone still unconvinced about the merits of an air
jacket to improve the efficiency of an alcohol stove? With the addition of the simmer ring, your Cat Stove can now be set
to burn 2 tbsp of fuel in anywhere from 6 minutes (will normally bring a pint
of water to a boil in 4-5 minutes) to 25 minutes (keeping your soup or cocoa
hot for as long as you would like.) I tried to weigh the simmer ring to
see how much it would add to the total weight of the stove (1.6 oz including
stand and windscreen), but it wouldn't move the needle on a scale that weighs
to 0.1 oz. You want to heat more water or simmer longer? Put in 3
tbsp of fuel! *
*
* *
*
*
* |

|
A NOTE ABOUT FUEL: Use pure alcohol, either alcohol stove fuel,
shellac thinner, or fuel line antifreeze (not radiator antifreeze!)
Read the label to be sure it is 100 percent denatured alcohol. Rubbing
alcohol contains up to 30 percent or more water, and doesn't burn well.
*
*
*
*
*
*
* |
|
AND A NOTE ABOUT MAKING THE STAND FOR YOUR STOVE: My stand is about 2.6 inches high. That is
as tall as will fit inside my pot. With this stand, my pot sits a
little more than one inch above the stove. If you make the stand higher so that your pot
sits 1.5 to 2 inches above the stove, it will work even better! Try
this if your pot is big enough to store the higher stand or if you don't care
to pack the stand inside the pot. *
*
*
*
*
*
* |
|
SIMMERING: If you don't want to fool with a simmer ring, try
dropping a bit of paraffin wax or candle into your stove. It will
continue to burn after the alcohol fuel is burned, keeping your coffee
warm. Go easy with this; it creates some soot and will blacken your
pot. *
*
*
*
*
*
* HAVING PROBLEMS WITH SOOT? You're probably using rubbing alcohol or
isopropyl alcohol instead of denatured methyl alcohol normally used as
fuel. The outside of my pot has darkened somewhat from long use, but
remains clean, not sooty. (I do stow my cooking gear in a storage bag
anyway, just so it all stays together.) *
*
*
*
*
*
* |
![]()